How to use Android Phone as Modem

Use mobile Internet on your computer with your mobile data plan you can use android phone as a modem and can access internet in your pc.
You want use internet on your pc but you are away from wired or Wi-Fi connection so don’t worry you can access internet via android Smartphone it’s called “Tethering”.
Tethering & Portable Hotspot
1. USB Tethering- by this option you can connect android phone and computer via USB Data cable.
2. Portable WLAN Hotspot (WiFi) - by this option you can access internet in Wi-Fi enable Computer.
3. Bluetooth Tethering- you can also share mobile internet data in Bluetooth enable computer by Bluetooth tethering.
110 Best WhatsApp Status
How to connect android phone to pc for internet access?
There are three ways to connect android mobile phone to computer all method is given below.1. Use internet connection via connecting USB Cable.
USB Tethering
Follow below steps to active USB tethering
Connect your USB Data cable with phone and computer.
Go to Setting option > Now Select More > Now Select Tethering &portable hotspot > Now Select USB Tethering.

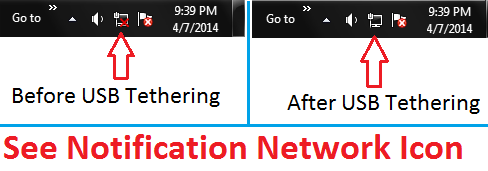
You have done it now your pc is connecting with android phone.
2. Use internet via Wi-Fi to computer.
Portable WLAN Hotspot
Follow below steps to Portable WLAN Hotspot
Go to Setting option > Now Select More > Now Select Tethering &portable hotspot > Now Select Portable WLAN Hotspot

Now Scan Wi-Fi connection in your Wi-Fi enable pc now your mobile name will be show in available connection now connect and use internet.
3. Use internet in your blutooth enables pc via your android phone.
Bluetooth Tethering
Follow below steps to Bluetooth Tethering
Turn on Bluetooth on your phone make your device visible to all.
Now click on the start button on your pc now click Device and printer > Now click on add device button.
Now Select your android phone from the list and now click "Next Button” to Run Wizard and follow all wizard step and pair your phone.
Next step- Go to Setting option > Now Select More > Now Select Tethering &portable hotspot> Now Select Bluetooth Tethering.

Now Again go to Device and Printer option in your window and click right button of mouse in your Bluetooth Mobile device Name which show in device and printer list and now click on Access point option in Connecting Using Access Point list. Now your mobile will be asked for permission to connect Press Allow in your mobile. now your mobile will be connecting with your pc.
Thanks I Hope You Like This Post
How to Recover Whatsapp Deleted Photos and Videos

Recover whatsapp deleted images videos and music this is a trick for whatsapp users it’s a hidden trick for get back deleted whatsapp receive and send medial files. Friends what happen if you delete your whatsapp receive photos videos or audio from gallery not from chat area and after delete you think o no it’s important image or video for you. It sometimes happens, don’t to worry friend we have a trick to recover delete media files without using any third party application.
How to get back whatsapp deleted media
Follow below step for recover whatsapp deleted media files if you delete this from gallery only.how to log in in whatsapp from web
Open chat area of your friend whom you want to recover deleted images or videos audios there will be show your deleted photos videos but it show blur click on image it will be load and open you can view your deleted videos photos and audios now you need to download and save this on your pc.
Demo
I’m going to recover my delete image see below demo image.
How to download whatsapp media file in pc from web.whatsapp.com


you may want to know
How To Hide Whatsapp Images/videos from Gallery in Android
Thanks I hope this post is helpful for you.
How To Remove Auto Read More Option From Blogger

How to remove auto read more feature from blogger’s blog?
Remove Auto Read more feature from your BlogSpot blog. Manage your blog as you want as we know blogger is most popular blogging service provider we are all thanks full for Google blogger service its make blogging very easy. By using of blogger blog you can publish you blog you don’t need to have extra knowledge of java html or any web development skill.
www.vktechzone.com wants to help to all new blogger who start blogging but they need some help to improve their blog traffic or design.
What is auto read more feature?
Auto read more is automatic feature that make post summary and show in page for read full post you need to click that post this feature is good feature for manage blog easily but some time we don’t want to use this feature. So you can remove this feature.
Why we need remove auto read more feature?
As we know in online market many blogger template are available for use but maximum template come with auto read more feature and you don’t want to break post and you want to show continue post in single page so don’t worry you can remove this auto read more feature.
How to remove auto read more?
Follow Below step
-
Note: Before change in HTML please take template Backup
- Go to your blogger Template option >> Click Edit HTML option.

Now find the below code it will be you find after <div class='post-body entry-content'>code.
Find Below given code
Note: some part of the code can be different, according to your template. But you can find this code easily.
Now replace above code with below Code.Now Save your Template. Your have done it
Now Refresh and Check your site auto read more option has removed from your template.
Incoming keywords
-
remove read more blogger template
Social Media Connecting Rotating Button for Blogger

Connecting social media cool rotate button for blogger add social media following button in your blog or website for connect facebook, twitter, Google+, Pinterest, Page or Rss feed.
How to add this rotate social button in your blog
Add Below Given Code in your blog to show Rotate social button on your blog.
<style>p#vktechzone_socialicons img {
-moz-transition: all 0.4s ease-in-out;
-webkit-transition: all 0.4s ease-in-out;
-o-transition: all 0.4s ease-in-out;
-ms-transition: all 0.4s ease-in-out;
transition: all 0.4s ease-in-out;
}
p#vktechzone_socialicons img:hover {
-moz-transform: rotate(160deg);
-webkit-transform: rotate(120deg);
-o-transform: rotate(120deg);
-ms-transform: rotate(120deg);
transform: rotate(120deg);
}
</style>
<center><p id="vktechzone_socialicons">
<a href="http://www.facebook.com/ vktechzone"target="blank">
<img border="0" src="https://lh5.googleusercontent.com/-Wg6R3S4r5JI/UbF-4VJKR1I/AAAAAAAABDs/2PplXc_j1X8/s64-no/Facebook+jagged+edge.png"></a>
<a href="http://www.twitter.com/vktechzone"target="blank">
<img border="0" src="https://lh5.googleusercontent.com/-3iBkoYvzlgg/UbGGPX4AkGI/AAAAAAAABHM/AJQHPaO8IPM/s64-no/jagged+twitter.png"></a>
<a href="https://plus.google.com/111153762318745795031/posts"target="blank">
<img border="0" src="https://lh6.googleusercontent.com/-fBPGk_pVrU0/UbF_QRttjTI/AAAAAAAABE0/t2RiWvw-Vd8/s64-no/google+plus+jagged+edge.png"></a>
<a href="http://pinterest.com/vktechzone/"target="blank">
<img border="0" src="https://lh3.googleusercontent.com/-joZKqdP600s/UbF_fW3E6QI/AAAAAAAABF8/Wr-GAEpZK00/s64-no/pinterest+jagged+edge.png"></a>
<a href="http://www.vktechzone.com/feeds/posts/default"target="blank">
<img border="0" src="https://lh3.googleusercontent.com/-rk3xOrnclFs/UbF_Yt7rnnI/AAAAAAAABFY/QuutSV-0iUM/s64-no/RSS+jagged+edge.png"></a>
</p></center>
<small><div style="font-size:50%; text-align:right;"><a href="http://www.vktechzone.com" target="_blank" title="Get This Widgets">Widget by vktechzone</a></div></small>
Note:-Replace vktechzone with your facebook page ID Replace 111153762318745795031 with your Google+ page ID Replace vktechzone with your Twitter ID Replace vktechzone with your Pinterest ID Replace http://www.vktechzone.com/feeds/posts/default with your Blog RSS URL
How to Add Html/Java widget? Follow below steps to add Widget
- Go to Blogger
- Go to your blog Layout option.
- Now Select Add a Gadget option.
- Now select Html/Java Script option
- Now past the above code in Content area field and press save button.
Know more About How to add Gadget In blogger
You May Also Like-Floating Facebook Like Box
You May Also Like-Magical Effect Social button
You can drag and adjust widget place in blogger layout
You can drag and adjust widget place in blogger layout
Add Back To Top Button in Blogger With Smooth Scrolling

How to add back to top smooth button
Follow Below steps for Add Back to top buttong for blogger- Go to Blogger
- Take Backup of your Blog Template
- Search For <head>
- Just Below of <head> past the following JQuery Code only if you are Not yet using Jquery Script on your blog
- Now Add Below Given Code in your blog by add a widget option
- Go to Blogger
- Go to your blog Layout option.
- Now Select Add a Gadget option.
- Now select Html/Java Script option
- Now past the above code in Content area field and press save button.
<script src='http://ajax.googleapis.com/ajax/libs/jquery/2.0.0/jquery.min.js'></script>
<!--Smooth Back to Top Button Start-->
<script>
jQuery(document).ready(function() {
var offset = 220;
var duration = 500;
jQuery(window).scroll(function() {
if (jQuery(this).scrollTop() > offset) {
jQuery('.back-to-top').fadeIn(duration);
} else {
jQuery('.back-to-top').fadeOut(duration);
}
});
jQuery('.back-to-top').click(function(event) {
event.preventDefault();
jQuery('html, body').animate({scrollTop: 0}, duration);
return false;
})
});
</script>
<style>
div#page {
max-width: 900px;
margin-left: auto;
margin-right: auto;
padding: 20px;
}
.back-to-top {
position: fixed;
bottom: 2em;
right: 0px;
text-decoration: none;
color: #000000;
background-color: rgba(235, 235, 235, 0.80);
font-size: 12px;
padding: 1em;
display: none;
}
.back-to-top:hover {
text-decoration: none;
}
</style>
<a href="#" class="back-to-top"><img src="https://blogger.googleusercontent.com/img/b/R29vZ2xl/AVvXsEj7dzI2r6m1BYVz5Weu5N3tvNdzf3Gvlwzht9MKPHomD2lEuX6gdrGAcNInR6MPmfZmeq2Cto0ANatQ9oxIWtv9saD-HvIqJRcDoOCGkGem7LyY_urw1eei8kSLJC0G8M8DnLNHVJdI_80c/s1600/back+to+top+.png" alt="Back to Top" / ></a>
<!--Smooth Back to Top Button End-->
Note:- you can use your favorite image for up arrow Only replace https://blogger.googleusercontent.com/img/b/R29vZ2xl/AVvXsEj7dzI2r6m1BYVz5Weu5N3tvNdzf3Gvlwzht9MKPHomD2lEuX6gdrGAcNInR6MPmfZmeq2Cto0ANatQ9oxIWtv9saD-HvIqJRcDoOCGkGem7LyY_urw1eei8kSLJC0G8M8DnLNHVJdI_80c/s1600/back+to+top+.png with your image URL.
How to Add Html/Java widget? Follow below steps to add Widget
Know more About How to add Gadget In blogger

Micromax Canvas Tab P690

 Announced |
2015, June |
 Display |
8.0 inches,IPS LCD capacitive touchscreen, 16M colors |
 OS |
Android OS, v4.4.4 (KitKat), upgradable to v5.0.2 (Lollipop) |
 CPU |
Quad-core 1.83 GHz |
 InternalMEMORY |
8 GB, 1 GB RAM |
 SIM |
YES |
 NETWORK |
3G, 2G |
 PrimaryCamera |
5 MP, 2592 х 1944 pixels, autofocus |
 SecondaryCamera |
2 MP |
 Sensors |
Accelerometer, proximity |
 BATTERY |
Non-removable Li-Ion 4000 mAh battery |
buy online in Low Price
Micromax Canvas Tab P690 user Opinion and Reviews
Friends if you are a Micromax Canvas Tab P690 user so please provide your opinion and review about this phone to help to other for choosing this phone post your review in below comment box.Micromax Canvas Sliver 5

Announced |
2015, June |
Display |
4.8 inches,AMOLED capacitive touchscreen, 16M colors |
OS |
Android OS, v5.0.2 (Lollipop) |
CPU |
Quad-core 1.2 GHz Cortex-A53 |
InternalMEMORY |
16 GB, 2 GB RAM |
SIM |
Nano-SIM |
NETWORK |
4G,3G,2G |
PrimaryCamera |
8 MP, 3264 x 2448 pixels, autofocus, LED flash |
SecondaryCamera |
5 MP |
Sensors |
Accelerometer, proximity |
BATTERY |
Li-Po 2000 mAh battery |
buy online in Low Price
Micromax Canvas Sliver 5 user Opinion and Reviews
Friends if you are a Micromax Canvas Sliver 5 user so please provide your opinion and review about this phone to help to other for choosing this phone post your review in below comment box.Micromax Canvas Nitro 2 E311

Announced |
2015, May |
Display |
5.0 inches,PS LCD capacitive touchscreen, 16M colors |
OS |
Android OS, v4.4.2 (KitKat) |
CPU |
Octa-core 1.4 GHz Cortex-A7 |
InternalMEMORY |
16 GB, 2 GB RAM |
SIM |
Dual SIM |
NETWORK |
3G, 2G |
PrimaryCamera |
13 MP, 4128 x 3096 pixels, autofocus, LED flash |
SecondaryCamera |
5 MP |
Sensors |
Accelerometer, proximity |
BATTERY |
Li-Ion 2400 mAh battery |
buy online in Low Price
Micromax Canvas Nitro 2 E311 user Opinion and Reviews
Friends if you are a Micromax Canvas Nitro 2 E311 user so please provide your opinion and review about this phone to help to other for choosing this phone post your review in below comment box.
Subscribe to:
Posts
(
Atom
)


