Showing posts with label Blogger Tricks. Show all posts
How to Backup and Restore Blogger Template

Why you need to backup your blogger template?
Are you planning for some change in your blogger template? If yes so it’s good and some time you must customize your blogger template according to blog requirement because Blog/sites layout and its appearance are Very important to attract your Blog reader’s eyes. Always we should try to improve our template design by adding or change in html, CSS or java scripts. But before making any change in blogger template you must first backup you blogger template. Because when you are editing in template there are chances for your template to crash and it will affect the complete site layout. At that instance you can revert it to your previous template by restoring it from backup.
Blogger provide all important facility for bloggers. Easily you can backup or restore your blogger template.
How to backup Blogger template?
Follow below step for get backup of your blogger template.
- Login to your Blogger Account
- Select your blog.
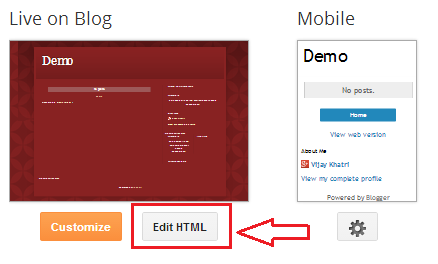
- Click on “Template” (See below helping image)
- Click “Backup / Restore” Button you will be find this bottom right side on the top. (See below helping image)
- After click Backup / Restore button a small window will be open. Now click to download full template button for Backup of you blog templates. (See below helping image)


- Now save your Blogger template backup file in your pc.
How to restore Blogger template?
Backup file restoring is very easy just follow below step for restore blogger template.
- Go to your Blogger dashboard and Click on “Template” (See below helping image)
- Select Backup/Restore button from top right corner. (See below helping image)
- Choose a template file from your computer and click upload. You have restored your template! (See below helping image)


I hope now you first backup your template after this your will Edit your template.
Also See How to add Html/JavaScript Gadget in blogger
How to Edit Blogger Template

Do you want to edit your blogger template html source code? You want add some css code/HTML tag or java Script in you blogger template for some change in your template but you have no idea how to change in html.
Don’t worries friends in this post you learn how to edit html codes and you will find all useful tricks for editing in html code.
Why we need Edit or modify blogger template html source code?
Some time you want to use third party JavaScript, widget in your blog for use this widget you need to add third party source code in your blogger template. But some widget you can add easily by add html/JavaScript gadget.
How to Edit Blogger Template HTML Source Code?
- Go to blogger Dashboard
- Select Template option
- Click in Edit HTML button.

Note:-Please Before editing in template html code first get backup of your blogger template if while editing template some mistake will be happen so by backup template file you can revert template like before by restore option.
How to Backup/Restore Blogger Template?
How to edit Template HTML?
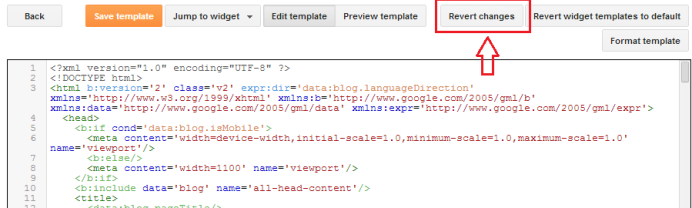
If you want find some code or keyword in template Press Ctrl+F for search box enter you keyword in search box and press enter this feature will be highlight you search keyword. (See below helping image)

If you want replace some keyword one by one press Ctrl+shift+F a small search box will be open in right site of the top enter you keyword press enter now Enter you new keyword which you want to replace with old keyword.

If you want to replace all same keyword by on click press Ctrl+Shift+R now enter you keyword which you want to replace now press Enter key now enter new keyword which you want to replace with old keyword.

Know more Feature of Blogger Template Editor.
Blogger Introduce this new template editor in October 2013 in this template editor blogger provide many feature like jump widget, revert changes. Below is given all major features and guide how to use this all useful feature.
Find Feature (Ctrl+F)
Quick Replace Feature (Ctrl+Shift+F)
Quick all replace Feature (Ctrl+Shift+R).
Jump to Widget.
Preview template.
Edit Template.
Revert Changes
Save Template.
For find some keyword press Ctrl+F for search you keyword.
For replace you keyword with other keyword press Ctrl+Shift+F this feature will change all same keywords one by one.
Exp- you want to change <h3> with <h2> you have 5 time <h3> so u need to press 5 time ok button for replace keyword.
For Replace all same keyword by one click press Ctrl+shift+R enter your keyword you want to replace now enter your new keyword which you want to replace with old keyword this feature will replace all old keyword with new keyword.
For finding code related to specific widget has become very easy by this new template editor, Just need click jump to widget dropdown button and select the widget which you want to modify or delete, by select widget you will be reach to widget source code area now you can easily modify that widget code.

By using of preview template option you can see preview of your template without saving your template if you like this preview then click on save template button.

Press edit template button if you press preview template and you want to go again in editing option so press edit template button.

Try HTML Editor Tool
If you make some change in html code and you check the preview and you don’t want to apply this change just press revert change button all changes will be delete but after press save template you can’t revert changes.
After check preview you want to keep this change press save template.

Thanks Friends I hope you like this post
How to Remove Blogger Navbar?

How to Remove Blogger Navigation Bar (Navbar)
What is Navbar in Blogger?
Blogger show a navigation bar by default at the top of every blogger blog it’s called navbar (Navigation Bar). Navigation is not bed it may be useful but sometime we need to remove this navbar. The Blogger navbar is mostly hidden in in third party blogger templates.
The advantages of Navbar are the Below given:
- When you click on the B icon, it will take you to blogger.com
- a quick link to your Dashboard and "Sign in /Sign out" dialog
- You can easily search for other blogs
- You can "Flag Blog" (if you consider content of a blog objectionable)
- Next Blog - takes you to a random, recently-updated Blogger blog
The disadvantage of navbar is... If you have customized design, Navbar doesn't fit in design for looking wise.
So how you can remove/Hide navbar?
Hiding of navbar is very easy you just need add small CSS code in your blogger template.
Add below given css in your blogger template.
How to add above css in blogger template for remove navbar.
Go to your Blogger dashboard and Click on > Template >Edit HTML Now find “]]></b:skin>” and just before this code pase above given CSS. Now save your Template and refresh your blog and see blogger navbar has been removed.
Know how to Customize blogger template
- How To Remove Auto Read More Option From Blogger
- remove blogger navbar css
- how to hide navbar in blogger
How to use Google Analytics in blogger?

Do you want to use Google Analytics in your blog for monitoring in your blog/website traffic? All Blogger want to know real or accurate statistics of his blog traffic. And every blogger should use Google Analytics for analyzed web traffic for make blog more useful according to type visitors. Google Analytics provide maximum information of visitor like which device visitor use desktop or mobile and by which search keyword visitor come in your site so you can provide more helpful information according to visitor search keyword. You can Install Google Analytics in your blog very easily below I will tell how to use and install Google Analytics in your blog.
Why you need to use Google Analytics in your blog?
Google Analytics is the best tool for traces your real and accurate traffic report. Google analytics is unique features which help to knowing the data about the blog/site visitors. Some awesome features are given below.
- Real Time Visitors: These features provide you information about Real time active visitors mean how many visitors are active now in your website. It’s providing more information like which page is using visitor or visitor geographical location and more.
- Geographical Location: You can know the geographical location of your visitors. You can know which country visitor mostly uses your site. .
- Average Visit Duration: One of the best features that you can know that how much time your blog visitor is spending on your blog. By know average visit duration you can get idea your site content or information is useful or not.
- Operator System, Browser and Service Provider: This feature is providing you visitor operating system or browser information like which operating system visitor use or which browser visitor use. Or show you service provider name .
- Page views, Daily Visits and Unique Visits: This tool provide information like how much page views are you getting daily and how much new visitors comes in your site today. .
How to Install Google Analytics in Blogger
Installing of Google analytic in blogger is very easy just follow below steps.
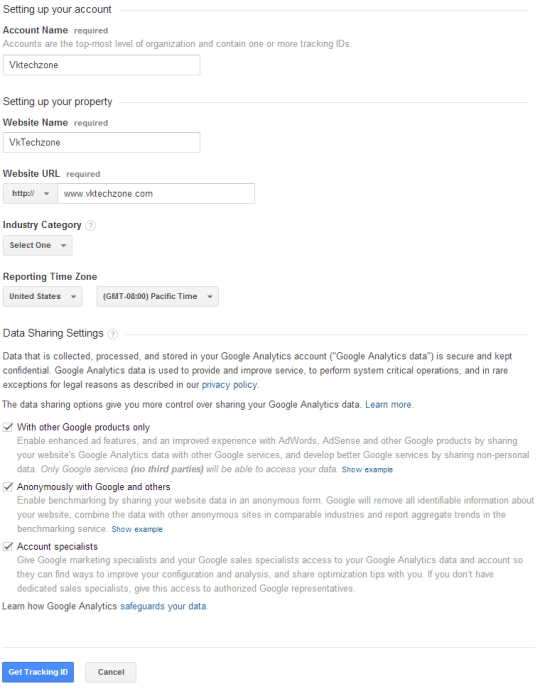
- Go to Google Analytics and Sign In With Google Account.
- Now click on signup button right side of the top. (See helping image below)
- Fill The Simple Form Fill It with Your Fields (See helping image below)
- After Filling The Form, Just Click The "Get Tracking ID" Button and Proceed To Next Step.
- Now here you’ll Be Asked for Accepting Their Policies, So Read Their Policies and Hit Accept Button. (See helping image below)
- After accept Terms of Service Agreement Google analytics will be provide you a Tracking ID code just add this code to your blog. (See helping image below)


How to add Google Analytics Tracking ID in Blogger
- Go to Blogger
- Go to your blog Layout option.
- Now Select Add a Gadget option.
- Now select Html/Java Script option
- Now past the Google analytics Tracking ID code in Content area field and press save button.
Know more About How to add Gadget In blogger
how to add unique meta description in blogger every post

Meta Description is very important part of every post for search engines because meta description is a summary of post info. Blogger has introduced the option of adding unique Meta description in every post.
Why we need Adding Unique Meta Description in every Post
Google use the Meta Description as a snippet while displaying search result just below title. Description shows what your page is actually about and its help to visitors by telling about your blog or website which kind of your page.
That's why we need add Unique Meta description according to post, it will help in optimizing your blog for Search Engines.
How to add unique meta Description in blogger every post?
Follow below step for adding unique description in all post.
- Log-in to your blogger Account
- Select your Blog.
- Click Setting option > Search Preferences (See below help Image)
- Click on Edit Meta Tag (See Below demo helping image)
- after click on Edit click on yes check box. (See Below demo helping image).
- Now enter your description and click on save change. (See Below demo helping image)


Note: This setting won’t work mostly in custom blogger templates and so we’ll have to insert some code to enable it. Go to Template >Edit HTML > copy the below lines of code and paste it just below the <head> tag.
If you are using other similar code remove that and add below given code.
Save your blogger template.
Now you can add different Meta description for every blog post accordint to post. You’ll find a new option “Search Description” in post creation form edit search description and enter your post description. (See Below demo helping image how this option look)

If you need any kind of help you can leave your comment in comment box
Thanks I hope you like this post
Subscribe to:
Posts
(
Atom
)


